|
EEP Mobile實例開發
訊光科技 / 顧琦
前言
JQuery Mobile,這個你不能不知的技術框架,它能夠幫助你快速開發出支援多種移動設備的Mobile應用及配合移動設備的使用者介面,它也是目前最流行的移動開發框架之一。隨著在JQuery在網頁開發上成為主流後,JQuery Mobile不僅給移動平台帶來JQuery核心程式庫,而且還提供了一個完整針對Mobile的JQuery 使用者介面框架。在VS2012版本中,同樣的微軟也將JQuery Mobile的框架放入VS2012中,並支援智慧感知功能(IntelliSense),對於VS的開發者是一大福音。
EEP Mobile即是以JQuery Mobile為基礎的前端平台,類似EEP JQuery的方式來存取EEP A/P Server,透過Server端所包裝好的Model數據服務,將資料以JQuery Mobile方式呈現,以滿足各種不同大小的移動設備來顯示資料或進行資料編輯等。EEP Mobile也包裝好了常用的UI元件以及快速產生畫面的Wizard工具,這樣,對於不會HardCoding的程式師們來說提供了更為方便的開發方式。本篇文章中,我們將針對Mobile的這些元件,為大家做一個實例的開發。
開發 Sever端服務
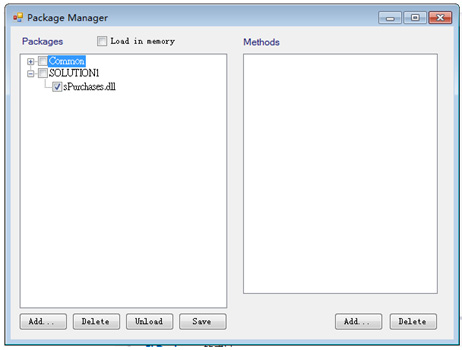
首先在VS2012中,使用EEPWizard來產生一個sProducts的Server端服務,用來提供給Mobile Client端的Server資料存取服務。並在EEPNetServer的PackageManager上加入sProducts,如下圖,透過Wizard選擇Product的資料表後即可輕鬆產生一個Server端的DLL。
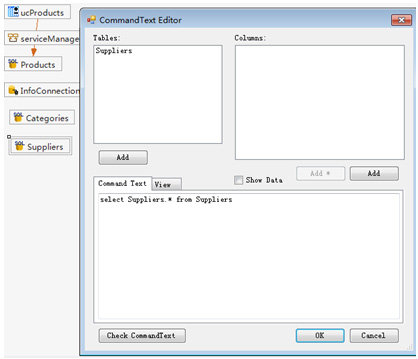
接著,請在前面產生的sProducts模組中,加入兩個infoCommand,並將它們的名字修改成Categories和Suppliers。且將它的SQL語法分別指向這兩個表。完成這個操作後,請重新建置sProducts。
接著,在EEPNetServer中將這個sProducts.dll模組,註冊到A/P Server中,如下:
開發Mobile端頁面
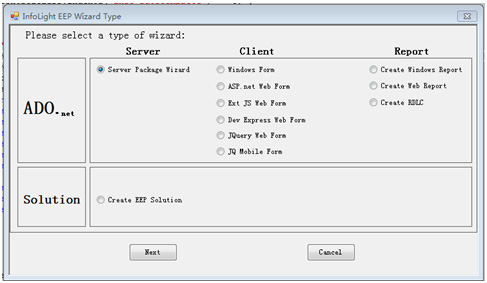
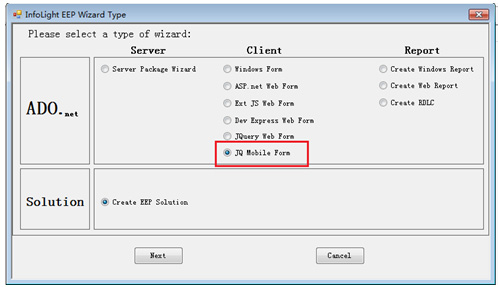
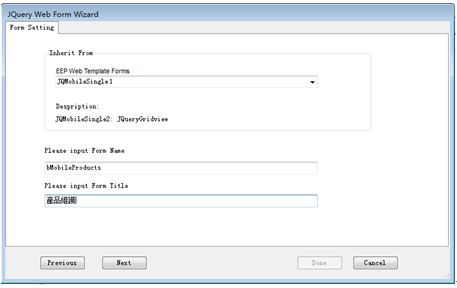
接著我們就開始使用EEPWizard來產生所需要的Mobile頁面。將工具-〉EEPWizard打開,並選擇JQMobile Form。
選擇Mobile的模板(Template),我們選擇JQMobileSingle1,代表產生一個單檔的Mobile頁面,Mobile表單命名為bMobileProduct。
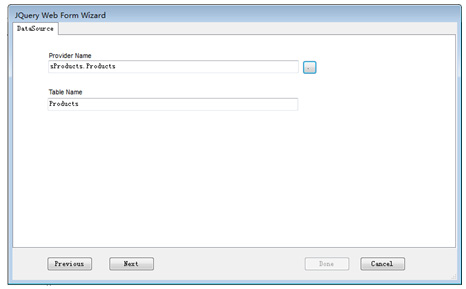
接下來,我們選擇所需要的Server端資料源(資料存取服務),選擇前面步驟所開發的sProducts。
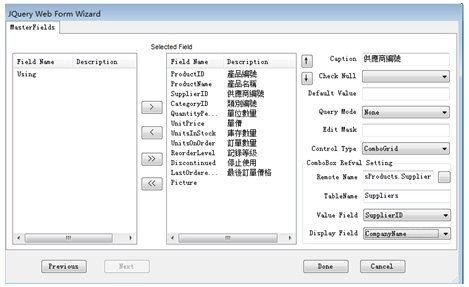
最後,選擇在畫面中所需要顯示的欄位,按下Done,一個JQMobile的頁面就自動產生了。
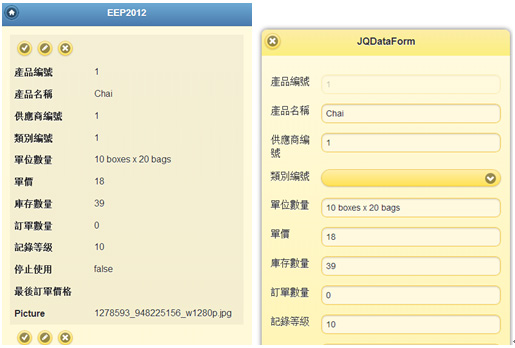
以下為Wizard所產生的Mobile頁面,全部以元組件的方式包裝好,開發者只要設定屬性即可完成所有設計。

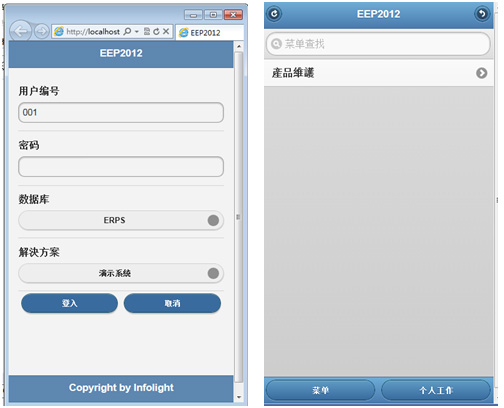
回到VS的方案總管中,打開MobileLogOn.aspx,將它在瀏覽器中瀏覽,登入帳號後,點開產品維護就可以得到這個最新的開發成果了。
改變Mobile頁面欄位
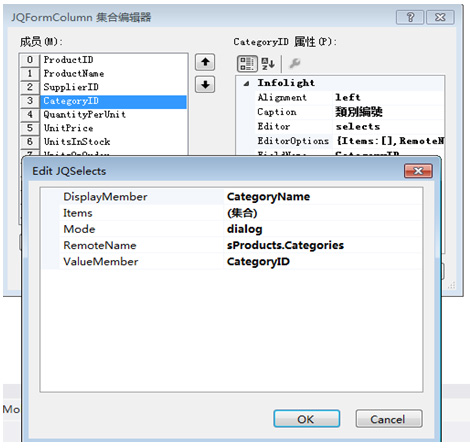
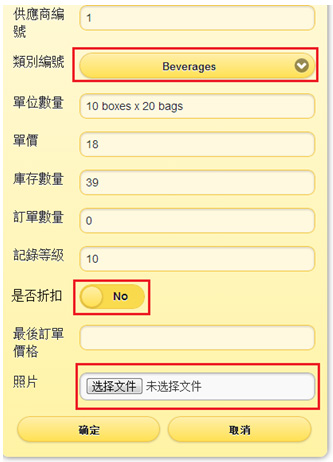
接下來我們就針對剛剛所產生的頁面中的一些欄位,來使用一些特定的元件來呈現不同的顯示風格與修改方式。我們選對編輯資料的DataForm來設定編輯的元件,如下:先對CategoryID(類別編號)設定它的Editor為selects(代表下拉選單),再點開EditorOptions來設定它的資料來源。
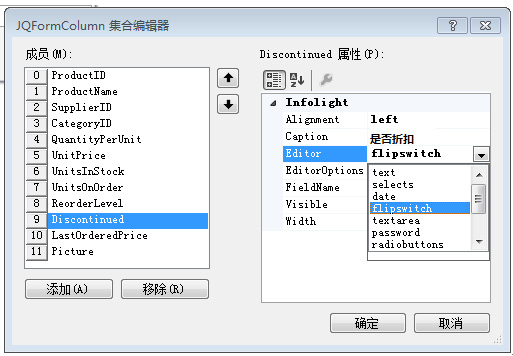
再來設定Discount(是否折扣),該欄位為bit類型,因此使用flipswitch元件來顯示true和false的功能。
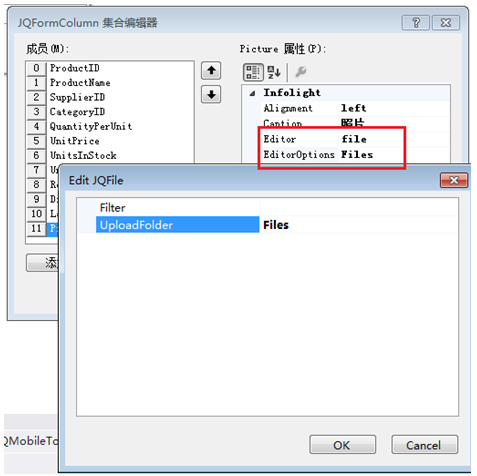
最後,將Picture(照片)欄位Editor設定為file(代表可上傳檔案),同時在EditorOptions中設定上傳資料的路徑。設計完成保存網頁,我們的設計就完成了。
重新打開產品維護,在進入編輯狀態時,可以看到類別編號、是否折扣以及照片的欄位都相應的顯示出所需要的元件。
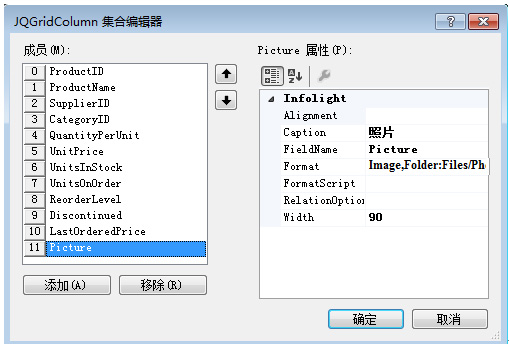
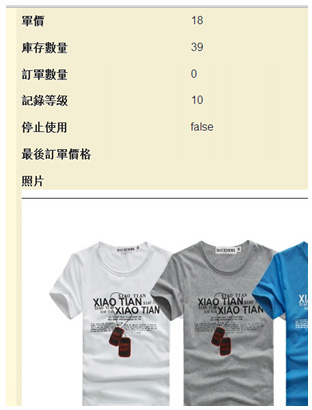
最後,我們發現照片欄位既然已經上傳了,那如何才能在Grid上顯示圖片呢?這時需要將JQDataGrid上的照片欄位對它的顯示格式進行一下修改。在Format屬性中設定:Image,Folder:Files/Photos,Height:200即可。
重新打開畫面,我們可以看到照片在瀏覽狀態下就會以圖片的形式顯示出來了。
結 論
透過上面的例子,我們會發現由於EEPWizard以及JQuery Mobile元件的整合,使得Mobile的設計變得簡單容易起來,對於許多剛剛接觸Mobile開發的設計者來説,基礎畫面只需要設定就可以快速的產生,相信會有更多的EEP使用者在這一個EEP Mobile產品裏感受到帶來的開發效率與便利。 | 


